-
Custom Weatherproof Pergola

Installation Guide Custom Weatherproof Pergola
-
Weatherproof Pergola Freestanding - 15'x15' / 15'x19'
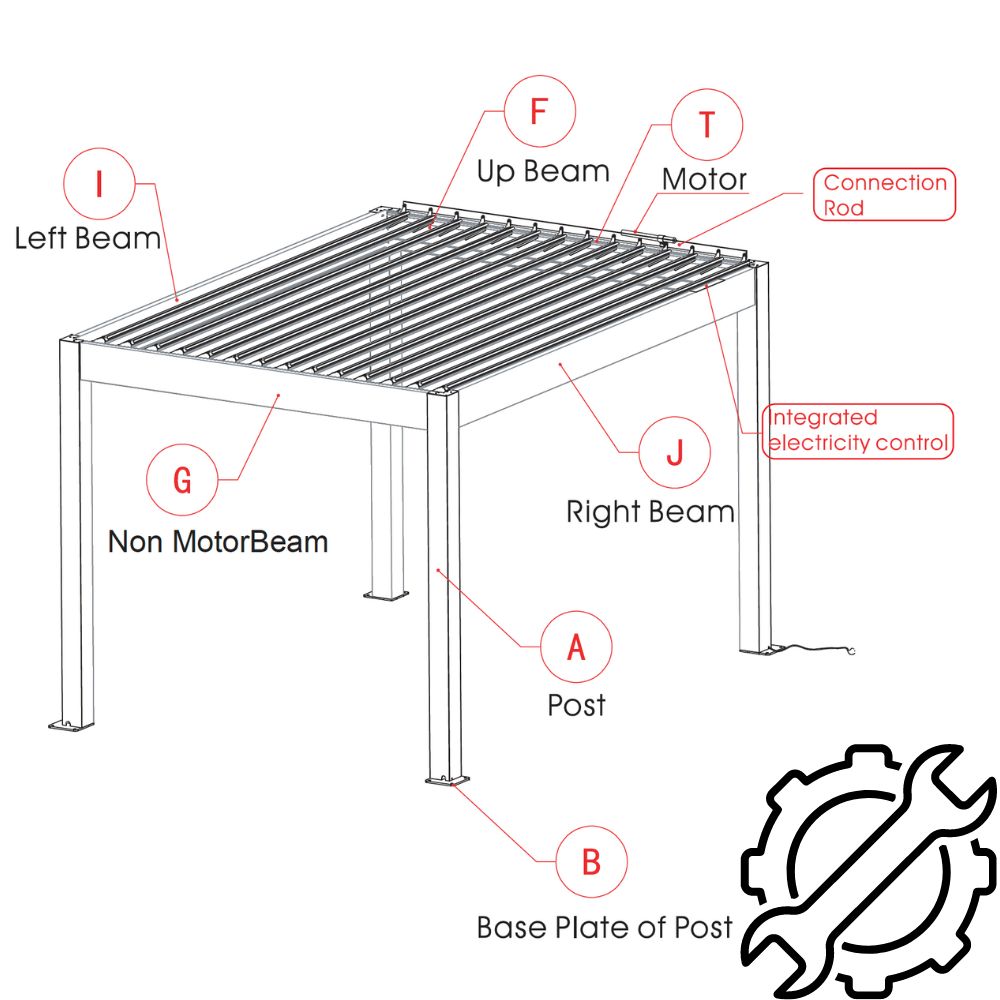
Before you start assembly. Lay it out like the 3D rendering and QC video we send, it will have all the labels on it like this in the link below. It will be as easy as putting a lego together.
Remember. Don’t use an impact driver. And if the screw broke at the bottom, no worry. It’s design to hold even with 4 small screw and 1 center larger screw. For it to smoothly goes in, you can apply some WD-40 on the screw before putting them in. We found that is pretty good!
You can find general instructions below of how each screw goes where and how they are done.
- Paper Instruction: FreeStanding => BON Pergola - Weatherproof Pergola 15x15 and 15x19 installation instruction
- Paper Instruction: FreeStanding 2 Bay => BON Pergola - Weatherproof Freestanding 2 Bay
- Paper Instruction: FreeStanding 4 Bay => BON Pergola - Weatherproof Freestanding 2 Bay
- Paper Instruction: Wall Mount => BON Pergola - Weatherproof Wall Mount
- Paper Instruction: Wall Mount 2 Bay => BON Pergola - Weatherproof Wall Mount 2 Bay
- Video Instruction for assembly (Animation):Video 1
- Video Instruction for assembly (In person):Video 2
- End Louver Instruction: End Louver Instruction
Electrical Diagram:
Pergola + Lighting : 110V 5AMP
Screen: 110V 5AMP
Heater: 110V 14AMP
Wall Mount Diagram:
If you have a center post, you will receive this pieces that connect the beams to the center post.
Center Post Piece
Gutter Corner Without Drain: (usually for wall mount version on the wall mount side)
Picture
Gutter Corner With Drain:
Picture
Please check which style you get before installing.
Fan Beam - Add On Style
Fan Beam - Custom Style (Gutter Fan Beam)
Instructions - Custom Shutter
- Weatherproof Pergola - Aluminium Sliding Shutters Installation Video Upper Railing Sliding System
- Weatherproof Pergola - Custom Aluminium Fixed Shutter Installation
- Weatherproof Pergola - Custom Aluminium Bi Folding Shutter Installation
Instructions - Sliding Glass
-
Weatherproof Pergola Freestanding - 15'x15' / 15'x19' Installation
-
Custom Weatherproof Pergola Assembly Timelapse
Troubleshooting
-
Weatherproof Pergola Wiring
Troubleshoot this -
Weatherproof Pergola Motor Position Adjustment
Troubleshoot this -
Weatherproof Pergola Motor Unprogram and Reprogram
Troubleshoot this -
Adjusting the limit of your Weatherproof Wind-Resistant Screen
Troubleshoot this -
Transfer Signal from Remote to Remote for Weatherproof Pergola
Troubleshoot this
More Weatherproof Pergola Installation Guides
-
Weatherproof Pergola Freestanding - 15'x15' / 15'x19'
See installation guide -
Custom Weatherproof Pergola
See installation guide
Weatherproof Pergola Accessories Installation Guides
-
Wind/Sun Resistant Screen - Weatherproof Pergola
See installation guide -
BON 1500W Smart Heater
See installation guide -
Bond Bridge Smart System
See installation guide -
Rain Sensor - Weatherproof Pergola
See installation guide -
Fan Beam - Weatherproof Pergola
See installation guide -
Bond Breeze Pro (Smart Sensor)
See installation guide
